DreamWidth Install Guide
Statcounter provides customisable hit counters, visitor tracking, web analytics and website stats for DreamWidth.
![]()
- Sign up for an account at Statcounter to get your code.
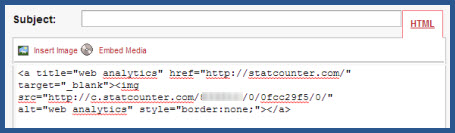
- Copy the StatCounter code.
- Log into your Dreamwidth.org account (opens in a new window) with your username and password.
- Go to "Post".

- Insert your StatCounter code into a post.
- Select "Private (Just You)" and then post the item.

Note 1:The code will need to be a) reinstalled once your subsequent blog posts have moved the counter post onto the next page of your journal or b) rather than reinstalling the code you may also simply edit the date of the counter post to make it appear on the current (top) page of your journal.
Note 2:You may also install your StatCounter code under the "mini-bio" area of the site in order to track visits to your profile.
Note 3:Dreamwidth.org allows the HTML-only version of StatCounter code. Certain stats will not be available such as referring links, keyword analysis, and page titles.
These instructions have been compiled and verified: December 2012
Get Started
Sign up for a Statcounter account using our DreamWidth installation guide.
Try it for FREE!Already a Member?
You can reinstall DreamWidth on your Statcounter project.
Installation Guides A - Z
- Adobe Contribute
- Adobe Muse
- Adobe Pagemill 3.0
- Adobe Portfolio
- BBEdit
- Beep
- BigCommerce
- Blogger
- BluDomain
- Britnett
- BuilderAll
- Cargo Collective
- Carrd
- Chime CMS
- Cloudflare Zaraz
- ClubRunner
- ComfyPage
- Concrete CMS
- create.net (DoYourOwnSite)
- Default
- deviantART
- Dreamweaver
- DreamWidth
- Drupal
- Duda
- eBay
- Ecwid store
- Exposure.co
- Expression Web
- Facebook Instant Articles
- Format.com
- Frames
- Frontpage 2000
- Frontpage 2002
- Frontpage 97/Express
- GoDaddy
- Google Sites
- Google Sites (new)
- Google Tag Manager
- Homestead
- HoTMetaL Pro
- HubSpot
- IMCreator
- iWeb
- iWeb (alternative)
- Jimdo
- Joomla
- Magento
- Media Wiki
- Microsoft Office Live
- Microsoft Publisher
- Moodle
- MSN Groups
- MSN Spaces
- Multiply
- MyBoomerPlace
- Net Objects Fusion
- Netscape Composer
- NVU editor
- OJS 3.1 (Open Journal System) Install Guide
- Online Picture Proof
- OpenCart
- PBase
- Photodeck
- PhotoShelter
- Posterous
- Prestashop
- ProPhoto Blog
- Qufoto
- Rapidweaver
- React
- Register.com
- Sandvox
- Serif Webplus 10
- Shopify
- Showit
- SingSnap
- Site123
- SiteSkins
- SmugMug
- Sparkle
- squadhelp
- SquareSpace
- Tagged
- theimagefile
- Tripod
- Tumblr
- TypePad
- Typo3
- vBulletin
- Vistaprint
- Visual Page 2.0
- Volusion
- Webflow
- Webnode
- Webs
- webShaper Install Guide
- Website X5 Pro
- WebStarts
- Weebly
- Wikispaces
- Wix html5 version
- Wix Premium
- WordPress
- WordPress.com
- WordPress.org
- Xanga
- Xara
- Xenforo
- Yahoo! Online Store
- Yahoo Groups
- Yahoo! Site Builder
- Yahoo Small Business
- Yola
- Yuku
- Zencart
- Zenfolio
- Zine Studio